Re-Use Art Show: The New IDEA Store Event Space

Above: Classic photo recursivity – me taking a picture of Melissa Mitchell taking a picture of me taking a picture of her…

Long time readers of this blog will recall both my love of art and my previous posts about The IDEA Store and creative re-use art. On two separate occasions I participated in the Hatch Art Show. Recently, The IDEA Store expanded to include a new classroom as well as event space. This past weekend, on May 20th, 2016 to be specific, they held their grand opening of said event space. My camera and I were in attendance.

Before I get to the actual art, I’d like to share this photo of area artists Cindy Sampson and Melissa Mitchell. I don’t think I can fully express just how wonderful these two women are and how much they inspire me. Not only are they talented artists but they are good, kindhearted people and great friends. While I had taken a couple of standard photos of these two together, I managed to snap this shot in the midst of genuine laughter and storytelling.

DSC00685

And now, on to the art! These are only a small representation of the works currently on display at the IDEA Store gallery – my understanding is that they’ll be on display through at least June 3, 2016.


David Spears, “Conundrum”

I just thought this was a really interesting and clever way to use all the stray puzzle pieces that end up scattered about.

Christina Nordholm, “Dance Club”

DanceClub (2)

Christina Nordholm, “Ready to Burn”

Ready2Burn (1)

I particularly like the way she incorporates tree bark into these pieces. I really enjoy the texture. Of the two, I prefer “Ready to Burn” because I personally enjoy the energy coming from it. I’m not sure whether it’s more like looking into the heart of a bonfire or Hell itself. Either way, I like it.

Grace Savina, “Paintings Past”

Savina (1)

I’m not quite sure what it is I’m looking at, but I kind of like that she managed to find a way to use old paint scraps. They almost look like little islands.

Grace Savina, “Dualities of Being”

SavinaDual (1)

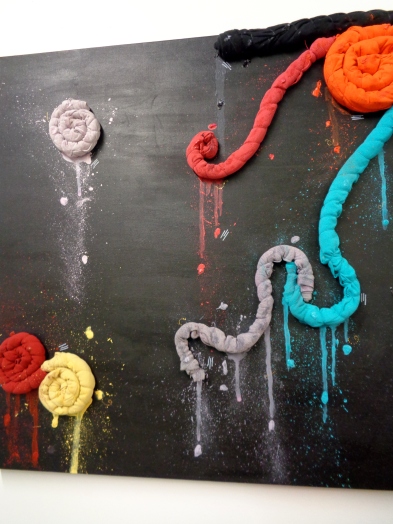
Again, not sure what the artist intended for these to be, but, to me, they look like really colorful intestines. Like someone gutted a unicorn. Or it exploded and this was just a section of gut splatter. I kind of doubt this is what she was going for, but this is where my warped mind took it.

Barry Land, “Love is Dead”

LandLove (1)

I always get a kick of out this kind of artwork. I have absolutely NO skill for it myself, but scrap-metal sculptures always make me smile. This one also makes me sad, though.

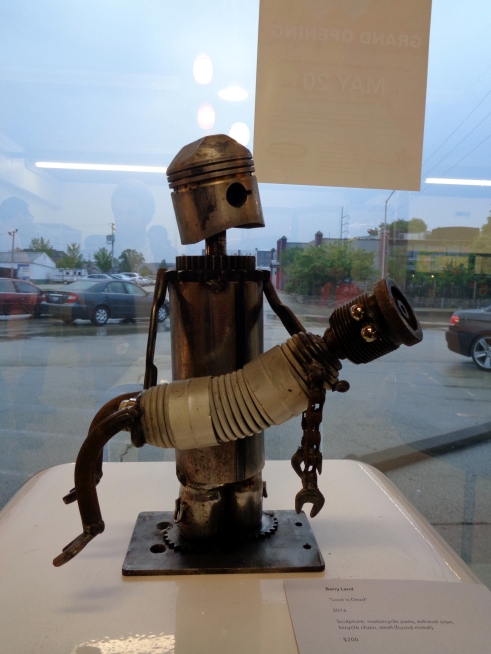
Barry Land, “Untitled”

LandUntitled (1)

Perhaps “Ode to Johnny 5” would have been copyright infringement? And yeah, he also looks like Wall-E. But we all know Wall-E was just a rip off of Johnny 5. If you don’t know who Johnny 5 is, I feel sorry for you, bro.

Jason Rackow, “Untitled”

RacrowUn (1)

Jason Rackow, “Sentience”

This is one of those pieces I would totally hang in my apartment, provided I had the money and the space. I don’t really have anything profound to say here, this piece is just Cool. As. F**k. Look that the close-up shots of that texture. Who knew all those little bits and pieces scattered about the garage could look like this?

Cindy Sampson, “Landscape”

CindyLandscape (1)

Cindy Sampson, “Lone Tree”

CindyTree (1)

I wish I could have gotten a better shot of this one. This was actually my favorite piece of the show and I couldn’t even really capture why. Because I’m too short and it was hanging too high for me to get a head on shot. The glare from the lighting at this angle does this piece a serious injustice.  I’m sure you can make out the main tree of in the painting. It seems to stand amidst a field of ghost trees. What you cannot see well in this photo, is that the paperwork underneath has faded building plans printed on it. To me, it seems to say suggest that this tree lost all of it’s friends and family to ever increasing urban expansion.The fruit and rust stains have the look of blood to me. Yeah, my mind is dark. I am very drawn to artwork like this where I can find and this kind of haunting meaning in it. It’s the kind of art the speaks to me on some deeper level.


No More Excuses/ Garden of Doll Heads

DSC00488

I am not above using scare tactics to keep my dolls in line. “This is what happens when you use my fabric scissors to cut paper”

I feel like I should be writing something. I also feel like I should be getting around to actually making some videos. I’ve been saying for awhile (over a year, while not necessarily always in this blog) that I want to start making Youtube videos.
-I invested the time and the money into decorating the walls in my craft room because I felt like I couldn’t start doing it unless I had a good background.

GE

$75+ and over a week invested in decorating these walls.

-Then I needed a camera, because I felt my point and shoot wasn’t good enough.
-Then I needed a tripod.
Then I needed quality editing software.
-Then I needed a computer.

DSC00352

The new computer. I have yet to justify buying it.

-Lately I’ve been concerned because of an acne flare up and not wanting to be ugly on camera. (Seriously, how am I still getting acne in my 30s? This is not fair)

Enough excuses. I will be making a Youtube debut before the end of the day on Friday of next week (4/15/2016). Maybe it will be crappy. But I need to stop talking about it and just *do it already*.

I’m also fully aware that I really need to finish the next segment of The Mission as well. I’m going to make sure I get that done before April is over. No more excuses. The start of grad school is only 2 months away. I need to utilize this time while I still have it.

different

Earlier this weekend, I went out to ACME Elfworks – my friend Melissa Mitchell’s studio -for the Annual Boneyard Arts festival. She’s a super cool re-use artist that uses a lot of found objects in her artwork. Many of her pieces incorporate dolls or various doll body parts. Her artwork is often whimsical, but can also be kind of creepy – and I love that. I first met her whilst I was involved with the HATCH art show about 3 years ago. I just happened to have my camera with me and have decided to share some of these photos with you all.

DSC00485

❤ the cart full of rats

DSC00484

Reminds me of Sid’s creation from the original Toy Story movie.

DSC00486

In case you were curious what became of Charlie Horse. He couldn’t cope after Lamb Chop’s Play Along ended – his heart was broken after he caught Lamb in bed with Hush Puppy and turned to drugs and gambling. Sherry Lewis attempted an intervention once before her death, but Charlie refused rehab. Unable to pay his debts one night, he was taken into a back alley where he was beaten to death. His lifeless body was thrown into a dumpster. I believe this is where Melissa found his little pony corpse. Not entirely sure what she did with the rest of the body. It’s possible her cats ate it.

DSC00480

A lush garden of doll heads. Melissa hacks off their scalps and uses them as macabre planters. This is a thing I shall someday do when I have a garden of my own.

DSC00481

I love the way her lifeless eyes are glazed over. Even in death, Barbie continues to smile.

Doll Surgery


Lately I have been trying my best to quell my wanting for new dolls. As it is, I do have a fair amount and rather than just to continue amassing more of them, it’s best that I try to focus on the ones I currently have. Though, I *did* pick up some recent acquisitions that I didn’t really even pay anything for. Yay free dollies!

HeadSwap (3)

Wait? FREE?? Yeah, free. Ok, $3 and some change. But practically free. Some months back I signed up for a Toys R Us credit card. Basically, the card accumulates points for dollar that I spend. Those points add up to money back that I can spend at Toys R Us. This haul was the result of earning $50 worth of points. There are probably better options out there for cash back or rewards and certainly lower interest rates. But this post isn’t so much about the card, as this is really my first foray into credit cards. I avoided them like the plague through college and even now they scare me just a bit. I have personally known too many people get hurt by them. I do not advise getting a credit card unless you have enough income to not be struggling from paycheck to paycheck and/or have very strong will power. It is very easy to think that a line of credit is like an emergency fund. IT IS NOT. I spend my credit the way I would spend my debit card – on stuff I would normally buy that I have the funds for in the bank. Then I pay it off in full (not the minimum) and as soon as what I’ve spent posts to the account.  All of that said, let’s get into the dolls.

So, if you look at the above photo, you’ll see that I got myself three of the Made to Move (MtM)dolls and two Fashionistas. I’d had the brunette and Asian MtM dolls already. I got two more of them for the sole purpose of rebodying.

HeadSwap (7)

Miss Candy Jumper (I haven’t yet given her an identity) didn’t quite match up with the brunette’s color. As you can see, she was a closer match to one of the Liv dolls I had laying around.

HeadSwap (15)

Livs aren’t as wondrously articulate as MtMs, but, before MtMs came on the market, Livs were about the best that could be had in play line articulation. Unfortunately, Liv heads are

HeadSwap (10)

Oops!

a much harder and less malleable material than Barbie heads. I had quite a bit of trouble. This doll did not wish to be decapitated. It was like I could almost hear her screaming. In the end, I pulled too hard and the little internal neck piece popped out and is now rattling inside the Liv head. But, I still want to use that Liv body, so, what do I do? I had to perform a trickier transplant…


Now, what you’re about to see may be gruesome. I extracted the part I needed from an older body in my dolly morgue. Don’t say I didn’t warn you!

It took some intense skill and precision on my part, but the transplant was successful! Let’s just hope these new parts aren’t rejected down the road. I don’t think Miss Candy Jumper wants to go through this ordeal again!

HeadSwap (13)

¡Gracias! Puedo doblar mis rodillas!

Here are all the new dollies, out of the boxes and post-op (I’m still working on the 5th):

HeadSwap (14)

So far, the only one I have a name for is the blonde curvy one. I’ve chosen to name her Diane, after my mother. I don’t really know why, she just reminds me of my mom. I’ll have to make her a new outfit (Mom was never one for dresses) and a little bandana.

DSC00449

My mother being radiant. The tiny one is me, around 3 years old. Gonna say this was 1988.


Of Life and Dollies: Updates, News, and Spoilers!

Blog1

My last post that showcased the new Barbies has gotten more views than any other post and in an incredibly short amount of time.

It’s been about a month now since my last posting. I’d actually written a rather long piece a few days back, but given its overly personal nature, I decided not to publish it. I don’t view it as a wasted effort, as the entire process was more therapeutic than anything. It needed to be written, it felt good to write it, but it just ultimately wasn’t destined to be shared. I know you understand.

I do have some updates to share with you all before I move on to new projects. Perhaps the biggest piece of news is that I have officially been accepted into grad school. It’s been a couple of weeks now, there was a big post about it on my personal Facebook, and a lot of the buzz from it has worn off since then. But it’s still pretty great news. I don’t know yet how that will affect this blog or any of my (still unfinished) projects as full-time school + a full-time job + a part-time job is already going to deplete a lot of my time. We’ll see how it goes. Classes won’t start for another three months yet, so don’t abandon me yet!

DSC00352

My new desktop set-up, nicely integrated into my craft room.

My next update is that I have finally managed to get myself a new computer. After discovering there is simply no way I can utilize Pinnacle on my laptop, I pooled the collective knowledge of all my techie friends together and got myself a new desktop that I’ll be using primarily for video and photo editing. I haven’t done a whole lot with it yet beyond just playing around with the new programs and learning how they work. It is a goal to launch Youtube content this year, but I don’t yet have a predicted timeline for it. I’m hoping to have a better understanding of what I’m doing before school starts.

In project news, I’ve decided to try out another re-root. After watching one of MyFroggyStuff’s recent videos I was inspired to try this out myself.

I’d already had a few doll heads that had been removed of hair that had been sitting in a box this past year, so I opted to use of of those. I decided to test out two different yarns – a soft, worsted weight, wool-like acrylic and a cotton crochet thread. I did a sample row with four sections to try out each of these yarns in both their intact and unraveled states. 

GE  YarnHair (2)  YarnHair (11)  YarnHair (12)  YarnHair (4)  YarnHair (7)  YarnHair (9)
YarnHair (6)  YarnHair (5)

My original plans for this particular doll when I first got her from a thrift store over a year ago, was for her to be a family member for my Lammily doll, Morrigan. If you’ll recall, when I envisioned a backstory for Morrigan, I determined that she has an Irish mother and a Turkish father. My first re-root doll was originally intended to be a maternal cousin, but fate had another purpose in store for her and I have since found a different doll to fill that role (more about her in a later post). As it turns out, I’ve decided to alter the identity and 12bf7c16039941cb8f55269b03308be8
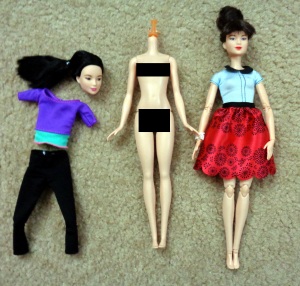
relationship of this particular doll as well. (Spoilers!!!  Since the Lammily company has announced their plans for a new male doll (currently being crowdfunded and due to begin shipping out in November), and because this new male doll looks similar to his female
counterpart in the face, it makes more sense to me to have him be a brother for Morrigan. And while Morrigan does not have any romantic inclinations at the moment, that doesn’t mean her brother doesn’t!)

Re-Rooting a Doll Head: Trial and Error

Last month I mentioned that I had picked up a couple of cheap-o thrift store Barbies with the intention to do some OOAK work on them. I have since removed their heads, removed their hair, ordered new hair, and have started the re-rooting process on one of the dolls.

If anyone is curious, this is the tutorial I am using:

How I will secure the final hair plug is yet to be determined.

Things I have learned so far:

  • Be super careful pulling out the original hair plugs. I accidentally blew out this woman’s forehead. I *did* find a way to fix this (Behold: Magic!), but I think I’m going to wait until after this first doll’s head is done before I mess with it.GE
  • “Carrot Cake” looks much more like strawberry blonde in person. Next time I will get a different shade.

    Even my camera is deceptive!

    Even my camera is deceptive!

  • I really have no idea how thick or thin these hair plugs need to be. Never having done this before and being worried about making her hair too sparse and thin, I think I may have made her hair *too* thick. Her head is only maybe half done and is already as thick as my Lammily’s.
    GE GE

Random bits of amusement I’ve gotten from this process so far:

  • Over in my Handmade Lammily Fashions group, one lady likened my progress photos to “brain surgery” and got (mock?) squeamish. I thought it was cute.
  • I’ve taken my in-progress doll head to work and have shown both my co-workers and the teenagers at the shelter. The reactions and looks on the faces of these kids has been priceless (they’re already used to me being “weird”, lol!)

Here are the rest of the photos of my progress thus far:

GE GE GE GE GE GE GE

Free to a Good Home!

So, I’m moving again in about a month. I’m steadily working on getting all of my stuff packed up. I’ve been sorting through all of my yarn, fabric, and general arty and crafty stuff. Some of it I am keeping, some of it I will be donating to local second hand stores, like The I.D.E.A. Store.

GE GE

So, quick and dirty — How many of you remember The Rag Rug? I spent over a year on it, I blogged about it: Here, Here, and Here. I only managed to get several months of use out of it before I moved into this place (where I have no room for it) and, now, the apartment I am going to be moving into is carpeted and I won’t need it there. I spent a long time and a lot of effort on this rug and I don’t want to just get rid of it, BUT, I don’t really need it. And I’m a big enough pack rat as it is. Therefore, if there is anyone out there interested in having this rug, you’re welcome to it for whatever the cost is of getting it to you. If you’re local, it’s free. If you’re halfway around the world, it’s going to cost you some money as the rug is pretty hefty. It measures 3 feet x 7 feet 3 inches.

GE

If you’re interested, email me at foxchic85@yahoo.com with “Rug” as a header. First come, first serve.

—————– UPDATE——————

The rug has found itself a new home. Thank you to everyone that expressed interest.


Come What May

So, welcome to 2014. New year, new chances to lie to myself about blogging more regularly and finishing unfinished projects. This will not be a polished entry, this may even get personal. Maybe. Right now I’m just typing words as they escape my brain between shoving unhealthy snacks in my face.

I’ve got my laptop next to me, with my camera, my sewing machine is out, and I have bits of fabric on the table. What follows is an insight into my creative and thought processes, raw, unedited – chaotic and probably going nowhere. But why am I still typing crap? Here – look at some pictures.

GE

This is some sexy lingerie I bought several years ago. I only wore them once. They don’t even fit me anymore. I’m going to chop them up. Why not?

GE

Chop CHOP! Choppy Chop! Lace is pretty.

GE

Oh, remember these? Yeah, I’m still not sure what to do with them, but, they’re sitting in a pile on the table.

GE

This looks kind of neat.

GE

CRAP! I need pink thread! The stores are closed! All I have is embroidery and hand quilting thread! Grrr…

Do I want to just sew it with a contrasting thread color? Or use embroidery thread? I don’t want to wait until morning. I’m pushing through, making do, not putting it off. Embroidery thread it is. Such is life. It doesn’t have to be perfect. It doesn’t have to be perfect. It doesn’t have to be perfect. It can be messy, it can be chaotic, and it will be ok. It will. I promise. Screw the fairy tales and the picture perfect notions of what should be. The harder you push it, the less idyllic/idealistic it will be. Ideallic. Is that a word? Screw it. It is now. #Ideallic. Go trend that crap.

Idyllic -1:  pleasing or picturesque in natural simplicity; 2:  of, relating to, or being an idyll

Idealistic – 1: of or relating to the philosophical doctrine of the reality of ideas; 2: of high moral or intellectual value; elevated in nature or style; “an exalted ideal”; “argue in terms of high-flown ideals”- Oliver Franks; “a noble and lofty concept”; “a grand purpose”

Yeah, neither of those quite do it for me quite the way it feels in my mind standing by themselves. Oh, so, here’s a thing I’ve been working on off and on that I don’t think I’ve posted about:

GE GE

I got the pattern from Urban Threads. It’s going to take me eons. Ok. I’m getting kind of sleepy. I think I’m going to post this and come back to this in the morning. Maybe I’ll get a stock of posts done to schedule over the next few weeks. Maybe I can be more regular. Maybe I can convince myself that I don’t actually NEED to have a point or well-formed idea. Maybe I can stop avoiding the blog and the facebook page when I haven’t finished any of my many unfinished projects. Maybe.

Laptop Bag: Making a Pocket

A couple months ago, while I was working on some other artwork, I took apart an old dress I’d picked up from FreeCycle eons ago and had been hoarding because I loved the pattern. I’ve decided I want to make a laptop bag with it. However, there are some modifications I had to make to the original Instructables pattern.

See, isn't that a gorgeous pattern?

See, isn’t that a gorgeous pattern?

First off, the material isn’t as heavy as that of a suit jacket. So, I needed to add some moderately thick interfacing to give it some extra stability. I only have 2 kinds of interfacing on hand – very thin fusible web and some generic sew-in interfacing that I picked up from somewhere ages ago (probably from my paternal grandmother) and I don’t even think the company that made it is around anymore. I don’t want to make a trip to the store, so I went with the 20+ year old sew-in stuff. It’s awesome how well this stuff kept. The point is, if your outer material is on the thin side, just about anything will do to stabilize it. If I didn’t have any interfacing, I could have used a layer of some slightly thicker fabric to add more durability.

The other thing I have to do is to create my own pockets. See, the beauty of using a suit jacket is that it already has pockets, so you don’t have to make them yourself. It’s a time saver, it really is. It can be a bit of a pain to draft and construct a pocket where none previously existed, but it can be done. Here’s how:

GE1) Measure out on the back where you need the hole for the pocket mouth to be. I do this my marking the center line. Then, you’ll want the mouth to be about 2.5 – 3 inches from the top. I decided I want my pocket to be about 5 inches wide, so, I made sure to put that 2.5 inch mark on that center line. You can use a rotory cutter or good scissors to carefully cut along that line.

Ignore the stitching along the sides. I had to play around with the pocket installation before I got it right. Also, you can tell the top bar hasn't been trimmed yet.

Ignore the stitching along the sides. I had to play around with the pocket installation before I got it right. Also, you can tell the top bar hasn’t been trimmed yet.

2) For each pocket I made, I cut out a rectangle of lining fabric about 5.5 -6 inches wide (wider than the mouth hole) by anywhere from 12-14 inches. It all depends on how deep you want your pocket. Say you want your pockets 6 inches deep. Since you’ll be folding the piece of lining in half, multiply the number of inches (in this case 6) by 2. Then, use some scrap piece of the outer material to line the top edge of each pocket piece. You will need this piece of outer material to blend in when pushing back the edges of the opening creates an open space. You’ll see what I mean later.

3) Starting with the bottom edge, face the right (face) side of the pocket to the right (face) side of the bag face, lining the edge of the pocket along the edge of the mouth hole. Pin into place and then sew. Go ahead and sew along the entire length of the pocket piece, even if it’s wider than the mouth hole. You can always use a seam ripper to pull out a stitch or two if you need to later.

GE4) Now you’re going to do the same thing with the top edge. Kind of loop the pocket lining over so that the edge of the right (face) side of the pocket runs along the top line of the mouth hole.  Sewing this one with a machine can be a little tricky, but it can be done.

GE5) Push the pocket into the mouth hole. Very carefully, work the edges of the mouth hole , pinching the edge from the pocket and the face, creating a smooth seam edge. Pin as you go. Pay particular attention to the two sides of the pocket slot. This is where you may need to take out a stitch or two – but just enough that you can push the pocket edges all the way in and create a smooth edge all the way around. Now, stitch around the pocket slot, making sure you don’t sew the pocket shut.

6) Sew the sides of the pocket shut.GE

Tada! You have created a pocket! I told you it was a pain in the ass, didn’t I? Now do you see why you needed that matching fabric at the top of the pocket piece?GE

Revisiting An Old Project: Laptop Bag

A couple years ago, my boyfriend emailed me a link he’d seen on making laptop bags out of men’s suit jackets (and strongly hinted that he wanted one). The pattern and instructions are over at Instructables. If you’re interested in making one, I suggest clicking that link, as I’m not going to be redundant here. 🙂

One of the things I would recommend if you’re going to make one would be to use some upholstery grade thread and denim or leather needles, as you’ll eventually end up pushing very thick layers of material through your machine. My poor little machine was crying for mercy when I made one of these bags for Neil.

OLYMPUS DIGITAL CAMERA      O

OLYMPUS DIGITAL CAMERA      OLYMPUS DIGITAL CAMERA

Now that I’m gearing up for this weekend’s Race Street Bash, I’ve decided to create more of these laptop bags, using the original Instructables pattern as a basis from which I will variate. Come back tomorrow evening for the first of these variations!

What I Get For Thinking

From this point forward, no more promises… I promise.

So, I’m still not quite ready to show you all the completed jacket. After I finished installing the back panel and tacked on the new cuffs, I noticed something…

GE GE

… The outer edge of the cuffs, and on the wrist along the bottom of the cuff, are more spots that are fraying too badly for me to just ignore. The entire reason I am doing this creative upcycle is prolong the life of this jacket for my friend. If I don’t do anything with these worn spots, they will eventually get worse. Well, even without those spots, the jacket will still eventually wear down, but I’m aiming for later rather than sooner.

As a result of this problem, I’ve been experimenting with different ideas on how to reinforce these weak zones without just throwing more patches on them. So, I had one crazy idea that I spent way too much time on only to fizzle out on me. I thought that perhaps I could use a decoratively cut strip of contrasting denim to cover those areas – providing the needed reinforcement while at the same time looking interesting.

GE GE GE

If you notice, while the band fits well at the cuff, it’s too short on the other side as the arm of the jacket begins to expand out. If I secure this band onto the jacket, it will cause bulging and puckering. So, now I need to come up with another idea. In the meantime here are some photos of the jacket showing the completed back panel replacement.

GE GE

In other news, I have about a week before I am set to share a table with another friend, Julia, at C4A’s Race Street Bash in Urbana, Illinois. This means the jacket is going on the back burner while I finish making things for that event. Given that the temperature has been in the 80’s this past week, I don’t think Melissa will be needing her jacket back just yet. Besides, as I’ve been experimenting on it, I’ve decided there are a couple more things I want to do, for the sake of aesthetics. 🙂